top of page
title: AR App - Design Communication Tool Development
date: 2018
city: Pittsburgh, US

Design Scenario Visualization Using Augmented Reality
IncreCom App Demo at Miller Gallery

Public communication is an essential factor towards the success of a development project. As the Incremental Community development concept would require a high level of communication throughout the project development process. With the technologies, many design communication/ visualization tools are available in the market. Ranging from digital sketchpad to modern virtual or mixed reality applications, there could help improve the communication and design decision making.
Experiment Hazelwood project uses Augmented Reality (AR) technology to enhance design communication, so stakeholders could orient themselves in the massing model. The mobile APP- IncreCom was created for research purpose, it demonstrates possible scenarios in the Incremental Development through projecting different digital models onto the same development site to communicate design strategies. IncreCom used Unity and Vuforia AR Kit to develop.
The AR app provides cost-efficient scenario demo option for planers and designers, and it's a more portable option for public meetings.
AR App Development Workflow
Step 1 - Model Preparation
The IncreCom App used Unity to develop. The software takes a wide range of 3D file formats, so it doesn't matter much which modeling platform is used for creating the original model. Experiment Hazelwood project used Rhino 6.0, the model could be exported as OBJ, FBX or SKP for Unity. In the IncreCom AR app, the development process exported all scenario models to SKP format. All scenario models are saved to the asset folder of Unity project where could be easily located.
Note: Please be aware that most of the urban scale design models are not modeled at/around the origin point (0,0,0), instead, these models use origin point as a reference point. In order to make it easy to find the model in the scene after importing, please move the model close to the origin point in the modeling program. For example, in Rhino, you can use the "move" command to move the model to w0,0,0 location.

Step 2 - Set Up Unity and Vuforia
Install Unity
Before the development process, please make sure Unity and Vuforia Augmented Reality extension are installed on your computer. This workflow tutorial doesn't include the process of software installation, the detailed installation process could be found at Unity Documentation - Vuforia. Please make sure Android Build Support, iOS Build Support, and Vuforia Augmented Reality Support are all checked. If you forgot to install them in the first place, you can still add these components in Unity later.

Create Project and Save Asset
Initiate Unity and start a new 3D project. After entering the operation window, move all the model files to the project asset folder for the easy locating purpose. After setting up the asset folders' location, a scene for each scenario should be created for switching in between the scenes to show the potential flexible community arrangements at the same location.
In IncreCom AR app project, two alternatives for the same development site were created for testing. Both alternatives would be added to the scenes for IncreCom App later after the photo target is added.
To add both scenarios, two scenes are added to the folder. For creating the AR scenes, you can right-click in the project window to add a scene. After creating an AR scene, please make sure the light is pointing in the correct direction you want, delete the default camera, and add AR Camera under Menu>GameObject>Vuforia>AR Camera. Or right-click on Scene Object window, AR Camera could be selected through the drop-down menu as well.


Apply for Development Key
To create the app through Vuforia Augmented Reality extension, you will need a Development Key for the application you are about to create. The process requires a Vuforia Developer account which could be set up easily through the registration page.
After signing in the account, you can select "Get Development Key" to get a free license key for the research application. Simply add the app name and read & accept the agreement.


After clicking the confirm bottom, you will be directed back to the License Manager page. You can then select the app name just created to retrieve the license key for Unity.

Add Development Key to Unity
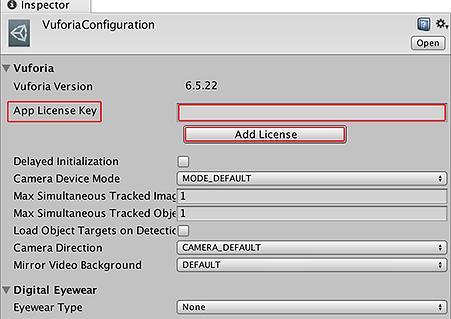
Copy the license key and return to Unity. You can right-click the AR Camera to check the Inspector on the right part of the window. Navigate down to the button "Open Vuforia configuration" and click it to open the configuration window.

To activate Vuforia Augmented Reality extension, please add the license key copied from Vuforia license manager to the Vuforia configuration in Unity by pasting into the "App License Key" box.
Create Photo Target Database
After Vuforia is activated in Unity and default Vuforia library is imported. You will need to create a photo target database for the project in order to project models onto the map target. You will navigate back to the Vuforia developer page and click Target Manager, and then click the Add Database button on the Target Manager page to open Create Database dialogue.

After creating the target database name, you will need to upload the photo you would use for the projecting purpose. The width of the photo should refer to the size of the print out you would like to project. Then create the name and click the Add button.

After adding the photo target, the Vuforia platform will verify and create the tracking points for the AR project. Please make sure the photo target you upload has a variety of tracking points, not plain paper, to ensure the quality of model projection.

Load Vuforia Photo Target Database
With the photo database created online, you will navigate back to the Vuforia Configuration to load online database to Unity by checking the box of the database you create.

Step 3 - Set Up the Scene

With all models saved in place, then find a location to create separate scenes for each scenario. Find the original two scenes you created or just create new scenes. To create a scene, right-click asset window and select "Create". Use the drop-down menu to locate "Scene" and select it. Then rename the scene accordingly. These scenes will be used for switching purpose later in the process.
Note: The app was designed for iOS, so the platform was changed to iOS in the Build Settings under files.
Create Separate Scenes
Add Photo Target
With the scenes created, you can load one scene first to add the photo target. You will navigate to the Game Object drop-down menu to select Image object under Vuforia.
Then select the Image Target from the database just loaded to Unity. After the image target is added to one scene, you can open another scene to do the same. Or you can duplicate the first scene and rename it to Scene 2.


Add Model onto the Image Target
Simply open the previous asset folder where you save all the scenarios, and then drag the Scenario 1 model on to the image. You will move and scale to make the model fit the existing site/building footprint.
Then you can switch to another scene and add the other scenario model on to the image and save the scenes in the Unity project.
Note: Again, please make sure the light and AR camera is capturing the model and image target, which you can view through a small camera view window.
Step 4 - Scripting the Switch between the Scenes
Add Switch Button
Add Switch Button
The app's scene switching function is click based, so a button for switching should be added for switching in between the scenes. To add a button, you will right-click the hierarchy window and navigate to the drop-down menu of UI and add a Button to both scenes.

After adding the button, you can change the Transition look of the button through the Button's Inspector Window. For example, the normal color, highlighted color when you hover on it and pressed color when clicking on it.

Under the Hierarchy window's Button component, select the text component and navigate back to its inspector to modify the text's font and size on the button.

Optional: Adding Description Text for Scenarios
Like adding a button, text function is also under UI drop-down menu. This is optional for the AR app, Nevertheless, the text description of each scenario would help users understand the design.
Note: Please note that the all text component should be oriented within the app frame under iOS setting.

Create Connection Script between the Scenes
To make the switching in between the scenes, these scripts will link different scenes. As all the scripts for the app were developed in Unity version 2017, the code may slightly change for newer versions. When copying the code, please load the UnityEngine and UnityEngine.SceneManagement, which is an updated function to manage all scene in the project for this version.
SwitchSceneto2 Script is meant for scene 1 and SwitchSceneto1 Script is meant for Scene 2 to loop back to the starting scene.


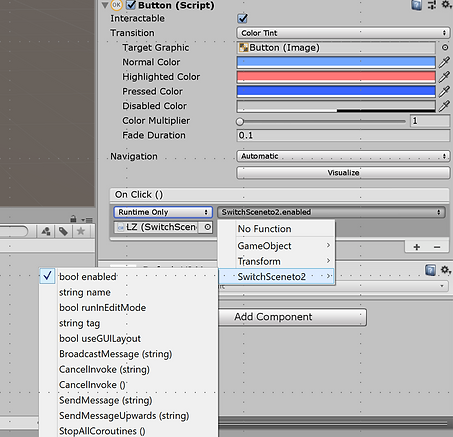
With the scripts ready, you will select the object(button) to attach the script to the buttons. After selecting the button from the Hierarchy window, navigate to Inspector window and locate On Click (). Select the object, which is the button's name, by clicking the round dot to show the pop-up window. After selecting the object, navigate to the box on the top right of the object selection window. You will need to load the script for the object by clicking the box and select SwitchSceneto2 (bool enabled).
To make the app switch back to Scene 1, open scene 2 and same operation process to load SwitchScene1 to the button in scene 2.
Step 5 - Export to Mobile Device
Modify Build Setting
After all components are correctly loaded through the steps, you will prepare to export the project for Xcode. Before exporting the project as an Xcode project. You will need to update the app confidentiality requirements, device access permission and other configuration description in the Player Settings, which you can find from Build Settings. For example, in Camera Usage Description, for the AR app should mention "The app requires access to the camera to activate the Augment Reality model" to acquire camera access.

Export the App
These are app testing photos which show the switch between the scenarios by clicking the button.
Open the Build and Run dialogue, and after selecting run, Unity creates an Xcode project package with the file name .xcodeproj. After connecting your iOS device to the iOS computer, you can easily export your app to your devices through the Xcode app. This tutorial doesn't include Xcode tutorial, but you can find how to export app to iOS here.


bottom of page